前面文章已经介绍了安装 CocoaPods 及使用详解,这一篇文章主要教大家制作自己的 CocoaPods 公开库,下面以 iOS 客户端 (DYFToast) 为例,做一个详细说明。
如果你是第一次发布自己的 CocoaPods 公开库,你就需要注册一个 trunk 账号。以下是 trunk 的相关内容。
一、Trunk
1、注册 Trunk
pod trunk register root921108@163.com 'root' --description='macOS Catalina' --verbose
- root921108@163.com - 一个真实存在的邮箱,不一定非得是@163.com,例如:“root921108@qq.com”。
- root - 用户名 (可选)
- macOS Catalina - 描述性文字 (可选)
- –verbose - 打印详细的日志
在注册成功后,你需要在注册时填写的邮箱里确认 trunk 账号信息,点击链接确认完成后,这样才能使用 trunk。
2、查看 Trunk
pod trunk me
显示如下:
$ pod trunk me
  - Name:     Ajax
  - Email:    dyfei_88@163.com
  - Since:    March 3rd, 2016 01:18
  - Pods:
    - clang_api
    - DYFAssistiveTouch
    - DYFCryptoUtils
    - DYFAssistiveTouchView
    - DYFToast
    - DYFBlurEffect
    - DYFCodeScanner
    - DYFAuthIDAndGestureLock
    - DYFProgressView
    - DYFStore
    - DYFStoreKit
    - DYFKeychain
    - DYFSwiftKeychain
    - DYFRuntimeProvider
    - DYFSwiftRuntimeProvider
  - Sessions:
    - March 3rd, 2016 01:18 - August 11th, 2018 11:03. IP: 111.203.224.45
    - May 9th, 12:04 - December 31st, 05:26. IP: 115.171.171.74 Description: Mojave
3、添加/移除其他 Pods 维护者
pod trunk add-owner 公共库名 root921108@163.com #公共库名,email
pod trunk remove-owner 公共库名 root921108@163.com #公共库名,email
4、查看某个 Pods 信息
pod trunk info DYFToast
显示如下:
DYFToast
    - Versions:
      - 2.0.1 (2019-08-11 07:58:52 UTC)
    - Owners:
      - Ajax <dyfei_88@163.com>
二、通过 Trunk 发布 Pods 到 CocoaPods
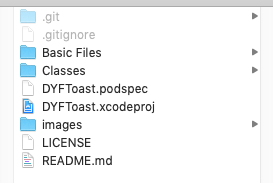
1、公开库 DYFToast 发布到 Github 上,创建 LICENSE 文件,并打上 tag 版本号
cd ~/Documents/GitHub/DYFToast/

git add .
git commit -m "commit"
git push origin master

git tag -a '2.0.1' -m "Add tag v2.0.1"
git push --tags
git tag

2、在 DYFToast 项目目录下,创建 podspec 文件
pod spec create DYFToast

3、配置 podspec 文件信息
Pod::Spec.new do |s|

  s.name         = "DYFToast"
  s.version      = "2.0.1"
  s.summary      = "Realize the simulation of Android's Toast in iOS."
  s.description  = <<-DESC
    This project uses chain programming and point syntax operation to realize the simulation of Android's Toast in iOS, and its code is concise and efficient.
                   DESC
  s.homepage     = "https://github.com/itenfay/DYFToast"
  s.license      = { :type => "MIT", :file => "LICENSE" }
  s.author       = { "dyf" => "vinphy.teng@foxmail.com" }
  s.platform     = :ios
  s.ios.deployment_target       = "8.0"
  s.source       = { :git => "https://github.com/itenfay/DYFToast.git", :tag => s.version.to_s }

  s.source_files = "Classes", "Classes/**/*.{h,m}"
  s.public_header_files = "Classes/**/*.h"

  s.frameworks = "Foundation", "UIKit", "CoreGraphics"
  s.requires_arc = true

end
podspec 文件介绍在这里不再叙述,推荐文章:
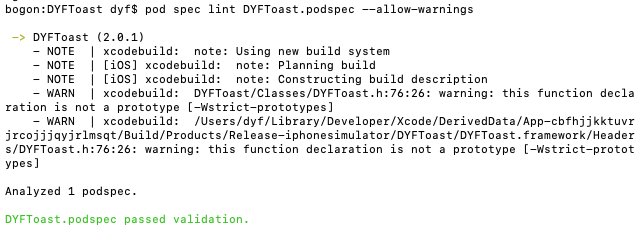
4、校验 podspec 文件
pod spec lint DYFToast.podspec --allow-warnings

5、发布到 Trunk
pod trunk push DYFToast.podspec --allow-warnings

6、更新 pod 库,并删除 pod 搜索索引
pod setup
rm ~/Library/Caches/CocoaPods/search_index.json

7、认领 Pod
8、搜索验证
pod search DYFToast

三、删除发布到 CocoaPods 上的 Pods
如果有小伙伴成功地删除了 pod trunk me 中 - Pods: 无效信息项(即被删除的公开库),就请给@我留言,让我学习一下。
pod trunk delete DYFToast 2.0.0 #删除指定版本的 pods
pod trunk deprecate DYFToast #将 pods 设置为过期
四、小技巧
1、Unable to find a pod with name, author, summary, or description matching ‘xxx’
说明:
搜索库:pod search xxx 报错,是 search_index.json 这个文件的原因,可以将其删除,然后重新生成便可解决此问题。
解决方法:
输入指令:rm ~/Library/Caches/CocoaPods/search_index.json,完成即可重新搜索。
2、CocoaPods was not able to update the master repo. If this is an unexpected issue and persists you can inspect it running pod repo update --verbose
其实刚看到这个问题,我是比较懵逼的,不过这句话其实已经告诉你了解决办法:–» 更新本地库。
所以我直接使用以下命令:
pod repo update --verbose
五、创建 CocoaPods 私有库
创建 CocoaPods 私有库的文章有很多很多,在这里不再叙述,推荐文章: